
Home | Mailing List | Specifications | Care and Feeding | Modifications | Vendors | Literature
new 4/16/2004
Special thanks on this project to:
Ian Macoomb, who helped me find my cutout, and helped with the plan for
installation.
My Dad, without whom this would never have happened. At times, I thought this
project would never be completed.
Planning:
Here's a drawing of what I ended up building: (click to view picture)

I had intended to remove the resonator at the same time, but the time was not
available, so its still in there awaiting removal at a later time. When this
project is complete, the McCord Power Plate 2 will me mounted to the cutout, and
the resonator will be replaced by a strait pipe.
Parts and supplies:
Parts Needed:
The Jegs cutout, designed for a mustang, I used the 2 3/8" cutout, it can be
found here:
http://www.jegs.com/cgi-bin/ncommerce3/ProductDisplay?prrfnbr=102162&prmenbr=361
$26.99
The McCord power plate 2, found at their web site:
http://www.mccordcg.com/mpp/mpp.htm I spent $120.00 on mine, but it
varies depending on options.
Red or copper silicone gasket.
An exhaust step down pipe, just a small one, that will fit outside one end of
the cutout, and inside the stock exhaust pipe, can be found at Advance Auto.
Factory style exhaust flange for 2 1/4" pipe. if you can find one, let me know
where! I had to build one.
3 lock washers, and nuts that will fit the cutout, I'm not sure of the exact
size of them though.
Assorted tools and supplies. wire ties etc...
Time:
This project is manageable in a weekend, it took me 2 days, with a week in
between since I put on my cutout before my power plate arrived.
My tasks for installation:
Looks of the exhaust before work began, I thought one of the most difficult
parts of this install would be to get the old exhaust off the car...
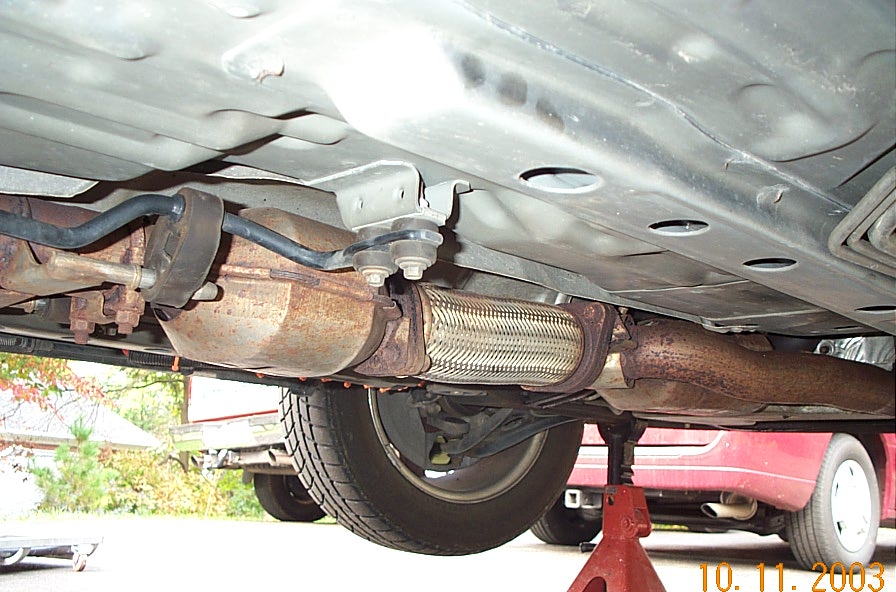
My first attempt on my own to break the bolts loose was useless, too much
rust, but with some liquid wrench, a long torque wrench, and two people one on
either side pushing and pulling on it, all but one of them gave, a cutting disk
and a chisel took care of the last remaining bolt, and inadvertently marked the
flex pipe so that I could find the right location later to reinstall it. As for
parts, I bought my cutout from Jegs, its the 2 3/8" mustang cutout, I meant to
get the 2 1/4 one as it would be the same size as the factory exhaust pipes, but
I made a mistake, no problem though, the slightly larger cutout worked
perfectly. Other parts I found at advance auto parts, being the adapter pieces
to fit into the end so that the cutout pipe could be fitted to the slip fit and
C-clamp connection behind the 3rd muffler. The hardest challenge of this install
was the single bolt flange that I would need, they are nowhere to be found,
absolutely no one sells them. It had to be manufactured.
With the flex pipe removed from the car, we traced the flange onto a piece of
1/4" steel, and cut it out with a cutting torch.
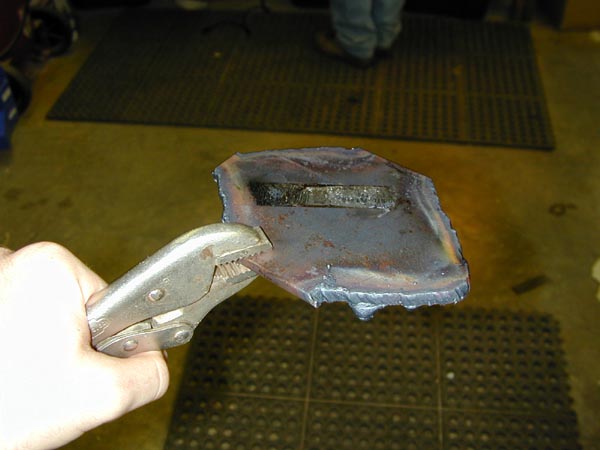
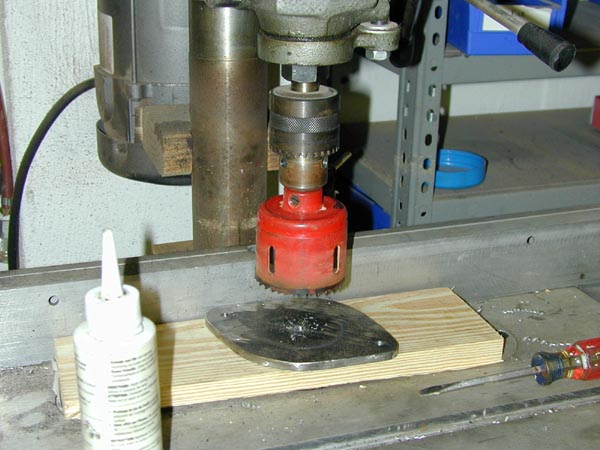
It was a work in progress, we took a grinder to it to shape it better and
smooth the edges, then using a drill press, we cut the 2 3/8" hole in the
middle, and spaced and drilled the bolt holes as well. After a quick fitting on
the car to determine and mark the direction that the flange needs to be
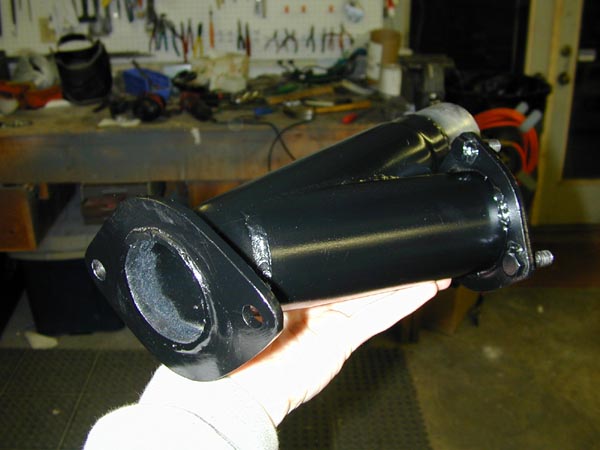
attached, the flange is welded to the end of the cutout on the front side. To
slide into the clamp fitting on the rear, we welded an exhaust adapter from
advance auto, they've got all kinds of fittings and adapters there, we found one
that fit the bill perfectly. The adapter is welded to the rearward facing end of
the cutout pipe.
Now its time to remount the cutout, if all went well, everything should fit back into place, rebolt the flex pipe, and the cutout pipe. Since the factory gasket will not seal around the new pipe, high temp silicone (copper) was used to make a new gasket, since it is still flowing through 2 cats, the temp will be within the 700 degree temperature rating. Speaking of temps, some engine block paint was used to help prevent rusting with the pipe itself, its rated for 500 degrees, I'll see how well it holds up. Ian found with this cutout installation that the exhaust hanger on the passenger's side had to be cut off in order for it to fit right. I was able to leave it on there with just the cutout, however the MPP2 unit would hit the hanger, so it had to be removed when the motorized component was added.
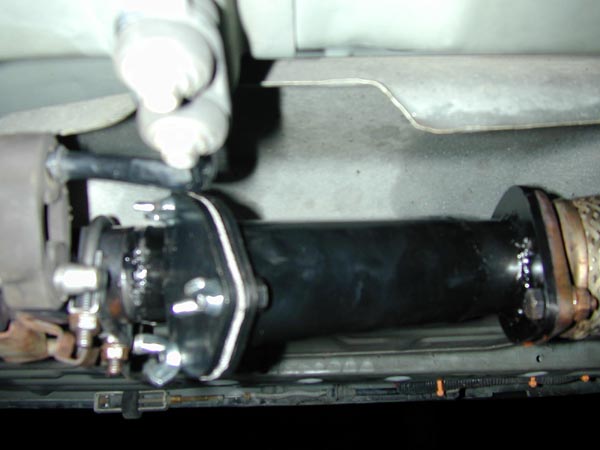
Now for adding the MPP2 unit. Installation took a bit longer than expected,
but not too bad. I was able to route the wire for the controls up through the
rubber grommet in the passenger's side floor, the hole proved to be slightly too
small however, and I had to use my Dremel to make it bigger so the plug would
fit through, the wire is pretty small, but the plug is huge. After that I used
some silicone sealant to make sure the original grommet would stay nicely in
place, since now its hole is bigger than it should be. The mechanics of the MPP2
interfere with the passenger's side exhaust hanger. So I had to remove that. No
cutting luckily, I just had to remove the 3 bolts that held it in and take it
off. Without that one side, I can see the flex pipe hanging just a slight be
lower than it was before, so in a temporary setup, I used a wire tie to hold the
exhaust up higher, I wrapped it around the exhaust hanger under the car, and on
the exhaust, basically does the same thing the stock rubber hangers do, but it
doesn't stretch to let it hang down too low, but still allows the exhaust to
move. I drove the car for an hour and then got under it, and was able to touch
the exhaust hangers on the pipe, they are far enough away from the exhaust that
they stay cool, so heat shouldn't be a problem. The single rubber hanger held it
up nicely but after a couple of days of holding the whole thing up on its own,
it got all stretched out. Installation of the MPP2 itself was pretty strait
forward:
Use some high temp silicone to form a gasket between the power plate and the
cutout, I didn't think about it at the time, but one of the gaskets supplied
with the cutout probably would have worked just fine, so silicone didn't have to
be used.
The power plate bolted up perfectly to the Jegs cutout, but you can't really get
a socket down into the groves around the mounting holes. It's hard to describe
without a picture of it, but a single lock washer allowed the bolt to stick out
far enough to get a socket on it until it was tight, a lock washer is a good
idea anyway.
Run the power and control wires though the grommet on the passenger's side foot
well. As described above, I had to make it bigger to fit the emissions connector
I had them install. But from the looks of it, the regular connector is just as
hard. It may be easier to cut the wire and reattach it afterwards, the wire
itself is small, the connector is huge.
Remember to tie the wire up under the car, it would be really nasty if it snags
something and pulls half your exhaust off with it.
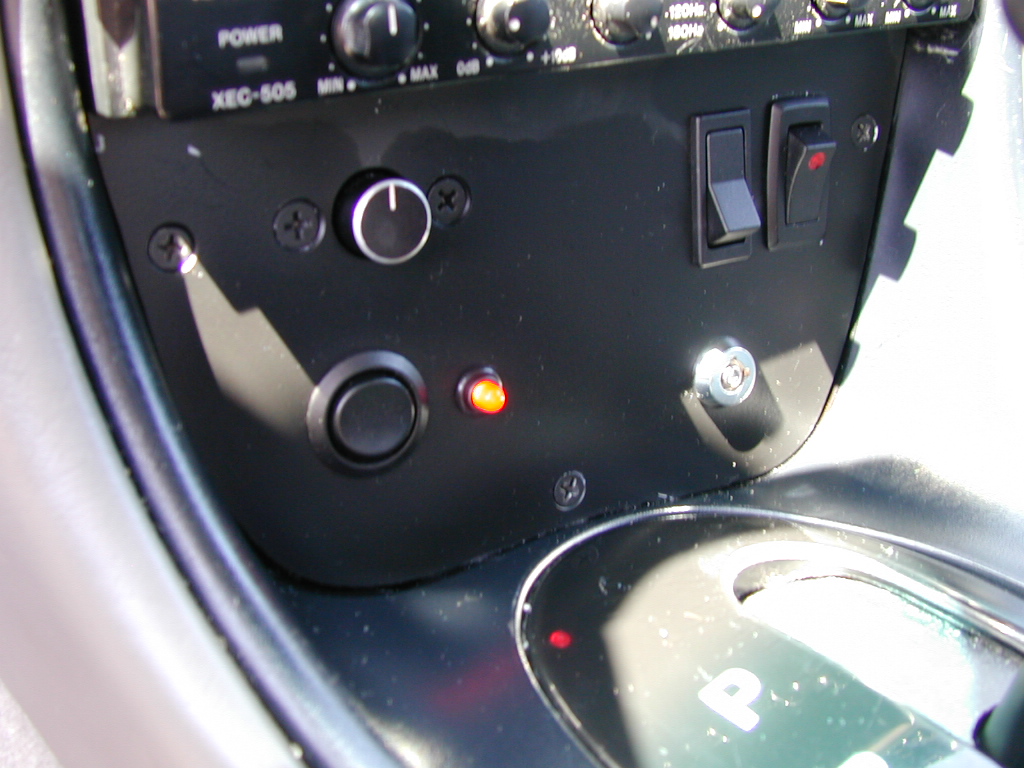
Mount the switch and connect to power. I mounted mine in my switch panel below
the stereo head unit, but for closer to stock cars the swing down cigarette
lighter tray is a good place to mount it. Only two wires need to be hooked up
the old fashioned way, the power and ground, which are attached to the switch. I
happened to have ACC terminal blocks in my car which are perfect for it, but if
not, it uses very small wires, and is fused at 5A, so the cigarette lighter
power would be more than adequate.
Test it out, if all goes well, you're done!
Heads up on the functioning of the switch, it is a two way rocker, one way is
open, the other is close, but one press doesn't open or close all the way, it
just activates the motor until it reaches it stopping point. so to open it you
have to hold the button until its all the way open. I was a bit disappointed at
first, but then I thought it does give the ability to open the plate to any
position, so you can maximize backpressure and torque at lower speeds, and still
have the awesome sound.


Performance of the cutout:
I've heard before that the rumors about backpressure being needed for low end
torque is just a hot-rodder's myth, but honestly, the butt dyno shows a
noticeable loss in low end torque when the plate is opened. But on the other
hand, it turned every head at the CCVT car show today! The sound with the plate
open is unreal! Although it may not improve performance in the quarter, it
really sounds good. Not that the car is without power with the plate off, it
still pulls pretty well, but it just doesn't feel as fast way down low. The high
end definitely will benefit from the increased air flow, but being non street
legal when opened, I couldn't try out the high end performance. I'm thinking
that after the power plate is installed, I can hit the switch just after launch
at the track, should be about perfect timing for maximum low end, and maximum
high end.
__________________________________________________________________________
I remember one of the guys on this list added one of these to his car, I
was curious where you put it. I was thinking of putting it where the 3rd
cat is located now.
Bill
___________________________________________________________________________
I think Ian put it in place of his flex pipe..
Clare
___________________________________________________________________________
You need to leave the flex pipe in place, it keeps the exhaust from tearing
itself apart when the engine moves, replace your 3rd cat with it.
Mike
___________________________________________________________________________
I put mine where the 3rd cat was. It's bolted right to the flange of the
flex-pipe. The cut-out is then connected to a straight pipe which is in
place of the resonator. Unfortunately the cut-out didn't last the winter
but I'm picking up another tomorrow. There's a brass rod that actuates a
microswitch that turns on an LED to tell you when the cut-out is closed. It
seized in place and prevented the motor from turning and one of the gears in
the motor lost a tooth.
The new one I order without the rod and microswitch. I didn't need an LED
to tell me when the cut-out was open.
Ian
It should be noted that as far as I know, Ian was the first to do this.
___________________________________________________________________________
Very true, and I’ve noticed that the LED doesn’t even work that well, it
doesn’t turn on until the cutout is almost completely open, and you hear the
roar from the engine at the first crack. Sucks that your cutout bit the dust, I
painted mine with engine block paint hoping that being behind the cats it might
survive, the paint didn’t make it though, the cutout is still fine. I might try
to find an even higher temp paint and keep working on it, something to keep the
salt off. Oh, and when you put your cutout back on, I would advise using
something to close off the opening in the heat shrink around the motor, my motor
died because of salt in there, replaced under warrenty, but I missed it! I
probably should not have had it on at all during the winter time, but its
supposed to be okay with it, anyway, they sent me a new motor and let me rebuild
it myself, so I protected it from water all the way down to the electrical
connector.
Mike
___________________________________________________________________________
My thanks to Mike who once again came through with a comprehensive write up on how to do this project. I was able to see and hear Ian's car at the Fall Lapeer Drag outing. AWESOME is one word to describe it. When he opens the gate, there's no doubt that the soul of the beast is heard!
U.L.
Hey Larry, can you add this to the cut-out page:
(from one of my posts on TCCA) A good muffler shop should have a flange that they can weld on and bolt it up to the stock flexpipe.
I almost forgot, get the cut-out installed with the Mccord power plate installed on it. Otherwise you may run into problems mounting the MPP. I got lucky with it.
I had some problems with my cut-out on Sunday. I was attempting to re-install the power plate (I take it off for the winter as the salt will kill it) and managed to break the remaining two studs. I had previously broke the first one. John Hamilton got out a grinder and ground off the heads of the studs and gave me a couple of nuts & bolts to replace the studs with. The studs on the Jeg's cut-out are actually nuts that have been welded to the cut-out. Using bolts instead of the studs will allow you to replace them every year without having to fight the rust. They get pretty rusty after a couple of years.
Ian