Home | Mailing List | Specifications | Care and Feeding | Modifications | Vendors | Literature


Hard Wiring an Electronic Device in the SHO

thanks to Seth Kuiper

new 4/24/01


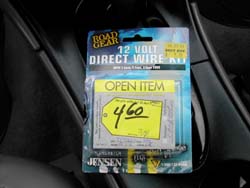
Cost = device + $10.00 hardwire kit from Best Buy

Time = 15 minutes (less for more talented mechanics)

Tools = ratchets, pliers, flat head screw driver, and a small amount of duct tape

Wounds = one cut to the left thumb

Instructions

  1. Buy an "electronic device" and a hardwire kit ($10.00 from Best Buy – I got the open box special for $4.60). Basically the kit comes with a straight piece of wire with an adapter plug for your radar on one end, and an inline fuse and a grounding wire on the other.  All you have to do is choose the proper plug for your detector, and route the wires down to your fuse box.
  2. Choose where you wish to mount the device, I chose right above the mirror, where it will get excellent reception and is difficult for thieves to spot.
  3. Lead the wire to the closest spot where you can run it down to the fuse box, which is under the steering column. In my case it was right above the mirror, tucked into the roof matting of the car.
  4. To supply power to the unit, I began tucking the wires up behind the drivers side window molding and secured them up there with some duct tape.
  5. Lead these wires down to the fuse box. When the door is open there is a panel with nothing in it. Remove the panel cover, it can be popped off with your fingers or the screwdriver, and lead the wires through the hole at the bottom left. This leads under the steering column to the fuse box. The panel is a great place to store the extra wires.

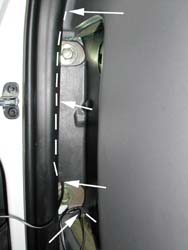
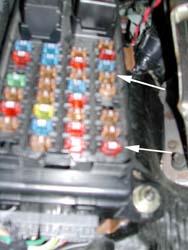
6. Now there are two things left to do: (a) ground to an all-metal surface. I mistakenly used a non-metal screw at first and it did not work. There are plenty of grounding locations to choose from. Then (b) plug the end with the resistor into a fuse of your choice. I chose the radio fuse, so the device turns on when I turn on the car. This part is kind of tricky. The forked end of the wire did not quite fit into the holes for the fuse, so I had to make it a little wider with the pliers. Now remove the fuse and insert the forked end of the wire. Once this is done, reinsert the fuse into the same holes as the wire, its kind of a tight fit, but works nonetheless. The top arrow points to the radio fuse, the bottom to the headlights.

Contact: sholero@mac.com <Seth Kuiper>


Contact Information