Home | Mailing List | Specifications | Care and Feeding | Modifications | Vendors | Literature
REMOVAL AND INSTALLATION
Shift Control Selector
Dial Bezel | Ignition/Shifter Interlock Cable | Transaxle
Range Selector Lever
Transmission Shift Cable and
Bracket | Transmission Control Switch | Transmission
Range (TR) Sensor
Transmission Range Indicator Lamp
Bulb
Shift Control Selector Dial Bezel
Removal
1. Remove transaxle range selector lever and housing as described.
2. Remove two shift indicator bulbs from transmission control selector dial bezel and remove shift indicator illumination wiring from transaxle range selector lever housing.
3. Unsnap and slide transaxle range selector lever bezel sleeve to expose transaxle range selector lever knob retaining screws.
4. Remove two transaxle range selector lever knob retaining screws.
5. CAUTION: Do not twist knob or plastic upper rod, damage could occur.
Push in on transaxle range selector lever knob button and carefully lift transaxle range selector lever off transaxle range selector lever.
6. Remove transaxle range selector lever bezel sleeve from transaxle range selector lever.
7. Remove four transmission control selector dial bezel retainer clips.
8. Unsnap and remove transmission control selector dial bezel from transaxle range selector lever housing.
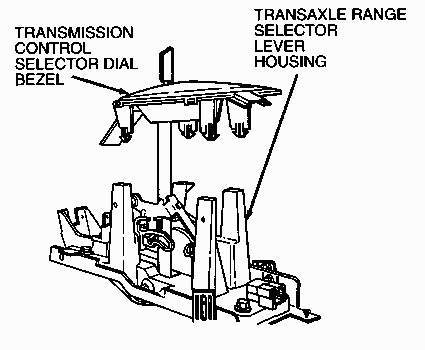
Installation
1. Install transmission control selector dial bezel onto transaxle range selector lever housing and secure with four retainer clips.
2. Install transaxle range selector lever bezel sleeve onto transaxle range selector lever.
3. Push in on transaxle range selector lever knob button and carefully install transaxle range selector lever knob onto transaxle range selector lever while aligning transmission control switch connector.
4. Install two transaxle range selector lever knob retaining screws.
5. Slide transaxle range selector lever bezel sleeve up and secure into position.
6. Install two shift indicator bulbs into transmission control selector dial bezel and route shift indicator illumination wiring behind transaxle range selector lever housing connector.
7. Install transaxle range selector lever and housing as described.
8. Adjust transaxle shift control linkage as described.
9. Check transmission control switch for proper operation. O/D
OFF indicator on instrument cluster should indicate switch
function.
Ignition/Shifter Interlock Cable--Floor Shift
Removal
1. Disconnect battery ground cable.
2. Unsnap and remove upper console bezels.
3. Disconnect ignition/shifter interlock cable conduit from bracket, pull cable from pink cam on transaxle range selector lever and housing.
4. Remove three screws and upper steering column shroud.
5. Insert a scratch awl into the access hole located in the bottom of the lower steering column shroud. Push in on the ignition lock cylinder release pin and rotate the ignition lock cylinder clockwise to the RUN position and remove the ignition lock cylinder from the steering column tube.
6. Remove the lower steering column shroud.
7. Remove the two screws and knee bolster from instrument panel.
8. Remove two nuts and steering column absorber.
9. Remove two nuts and lower steering column tube.
10. Remove two Torx® head screws from ignition/shifter interlock actuator.
11. Remove ignition/shifter interlock cable from vehicle.
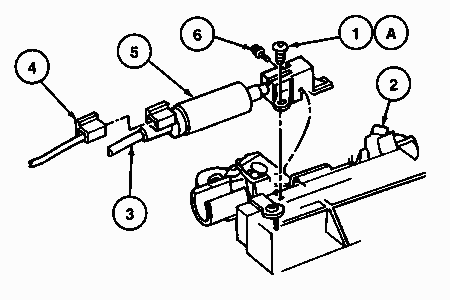
| Item | Part Number | Description |
| 1 | N806038-S58 | Screw |
| 2 | 3514 | Steering Column Tube |
| 3 | 3F719 | Ignition/Shifter Interlock Cable |
| 4 | -- | Ignition/Shifter Interlock Actuator Electrical Connector |
| 5 | -- | Ignition/Shifter Interlock Actuator (Part of 3F719) |
| 6 | N805138-S2 | Screw |
| A | -- | Tighten to 2.0 N-m (17 Lb-In) |
Installation
1. Install ignition/shifter interlock cable into vehicle and route into position.
2. Secure ignition/shifter interlock actuator to steering column tube with two Torx® head screws. Tighten screws to 2 N-m (17 lb-in).
3. Raise steering column tube into position and secure with two nuts. Tighten nuts to 13-17 N-m (10-12 lb-ft).
4. Install steering column absorber and secure with two nuts. Tighten nuts to 13-17 N-m (10-12 lb-ft).
5. Install knee bolster to instrument panel and secure with two screws.
6. Place lower steering column shroud into position and insert ignition lock cylinder into steering column tube.
7. Install upper steering column shroud and secure with three screws.
8. Feed ignition/shifter interlock cable core into pink cam on transaxle range selector lever, snap cable conduit onto bracket.
9. Install and secure upper console bezels.
10. Connect battery ground cable.
11. Check for proper ignition/shifter interlock operation. The
ignition key should be removable only with the transaxle range
selector lever in PARK. The transaxle range selector lever should
be locked in the PARK position with the key removed.
Transaxle Range Selector Lever, Floor Shift
Removal and Installation
1. Disconnect battery ground cable.
2. Remove center console assembly.
3. Disconnect transmission shift cable from transaxle range selector lever and transaxle range selector lever housing.
4. Disconnect ignition/shifter interlock cable from transaxle range selector lever and transaxle range selector lever housing.
5. Remove transaxle range selector lever and housing from vehicle.
6. To install, reverse Removal procedure.
Transmission Shift Cable and Bracket, Floor Shift
Removal
1. Disconnect battery ground cable.
2. Remove air cleaner assembly.
3. Remove speed control actuator cable.
4. Remove center console assembly.
5. Disconnect transmission shift cable from transaxle range selector lever.
6. Attach mechanics wire to the selector lever end of the shift cable.
7. Remove one nut and disconnect shift cable from manual control lever.
8. Remove shift cable from shift cable bracket.
9. Dislodge transmission shift cable grommet from dash panel and gently pull transmission shift cable through dash panel from engine compartment side being careful not to pull mechanics wire completely through dash panel.
10. Remove two bolts, one nut and shift cable bracket from transaxle.
Installation
1. Install shift cable bracket to transaxle and secure with two bolts and one nut. Tighten bolts and nut to 20-25 N-m (15-18 lb-ft).
2. Attach mechanic's wire to shift selector lever end of shift cable and thread opposite end of mechanics wire through dash panel and into passenger compartment.
3. Gently pull shift cable through dash panel and into passenger compartment side until shift cable grommet can be seated into dash panel.
4. Install shift cable into shift cable bracket and secure with shift actuator cable fitting.
5. Connect shift cable to manual control lever and secure with shift cable-to-manual control lever nut. Do not tighten nut until shift cable has been adjusted.
6. Connect shift cable to transaxle range selector lever.
7. Adjust shift cable. Place transaxle range selector lever in (D) position. Tighten shift cable-to-manual control lever nut to 17-23 N-m (13-17 lb-ft).
8. Install center console assembly.
9. Install speed control actuator cable.
10. Install air cleaner assembly.
11. Connect battery ground cable.
12. Check transaxle operation in each range. Make sure park mechanism and transmission range (TR) sensor are functioning properly.
Shift Cable and Bracket--Floor Shift
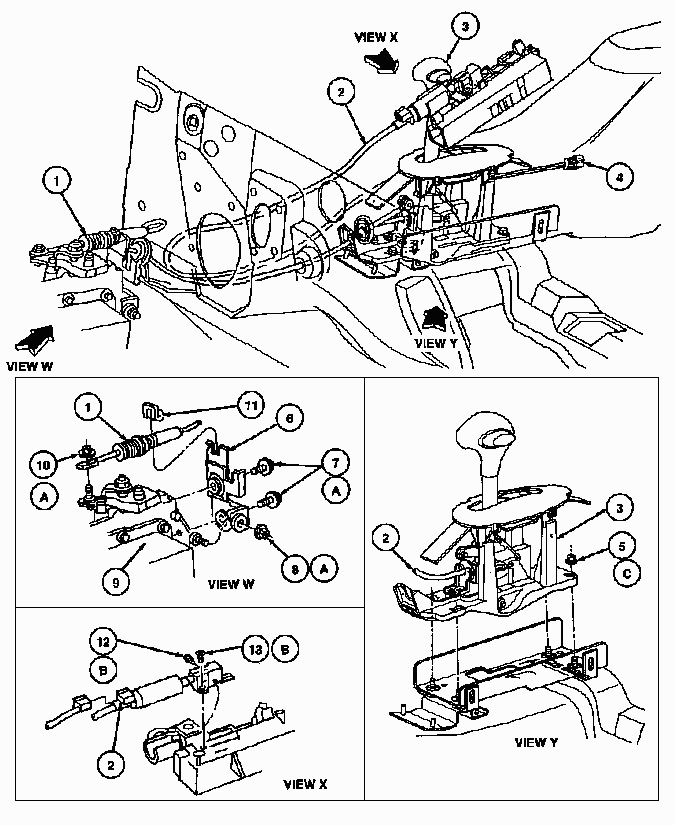
| Item | Part Number | Description |
| 1 | 7E395 | Transmission Shift Cable |
| 2 | 3F719 | Ignition/Shifter Interlock Cable |
| 3 | 7K004 | Transaxle Range Selector Lever and Housing Assembly |
| 4 | 14489 | Data Link Connector |
| 5 | N804794-S56 | Nut |
| 6 | 7K499 | Transmission Shift Cable Bracket |
| 7 | N804804-S100 | Bolt |
| 8 | N803766-S56 | Nut |
| 9 | 7G004 | Main Control Cover |
| 10 | N801555-S56 | Nut |
| 11 | 7H181 | Shift Actuator Cable Fitting |
| 12 | N805138-S2 | Screw |
| 13 | N806038-S58 | Screw |
| A | -- | Tighten to 20-26 N-m (15-19 Lb-Ft) |
| B | -- | Tighten to 2.0 N-m (17 Lb-In) |
| C | -- | Tighten to 8-10 N-m (71-88 Lb-In) |
Removal and Installation
1. Disconnect battery ground cable.
2. Carefully remove transmission control switch button from transaxle range selector lever knob.
3. Remove transmission control switch contact from inside transaxle range selector lever knob.
4. To install, reverse Removal procedure. Make sure the transmission control switch contact is installed in the transaxle range selector lever knob with the convex side of the contact facing outward toward the transmission control switch button.
5. Check transmission control switch for proper operation.
"O/D OFF" indicator on instrument cluster should
indicate switch function.
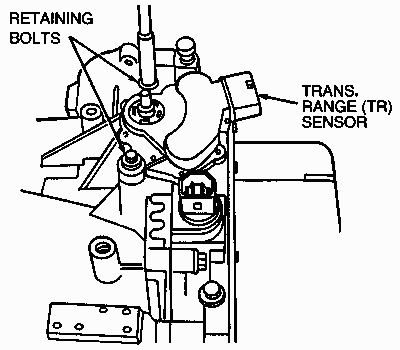
Transmission Range (TR) Sensor
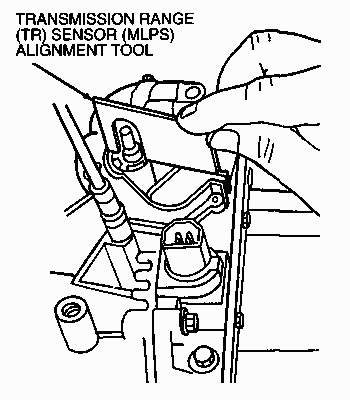
SPECIAL SERVICE TOOL(S) REQUIRED
| Description | Tool Number |
| Transmission Range (TR) Sensor (MLPS) Alignment Tool | T92P-70010-AH |
Removal
1. Disconnect battery ground cable.
2. Place manual control lever in NEUTRAL.
3. Remove engine air cleaner and air cleaner outlet tube.
4. Disconnect electrical connector from transmission range (TR) sensor.
5. Remove manual control lever from transaxle.
6. Remove two TR sensor retaining bolts.
7. Remove transmission range (TR) sensor.
Installation
1. Make sure manual control lever is in the NEUTRAL position.
2. Install transmission range (TR) sensor and loosely install two retaining bolts.
3. Align TR sensor slots using Transmission Range (TR) Sensor (MLPS) Alignment Tool T92P-70010-AH.
4. Tighten TR sensor retaining bolts to 9-12 N-m (80-106 lb-in) and remove tool.
5. Connect electrical harness to transmission range (TR) sensor.
6. Install transaxle manual control lever. Tighten to 11-16 N-m (98-141 lb-in).
7. Install air cleaner outlet tube and engine air cleaner..
8. Connect battery ground cable.
9. Check for proper operation with parking brake control engaged. The engine should start only in PARK or NEUTRAL.
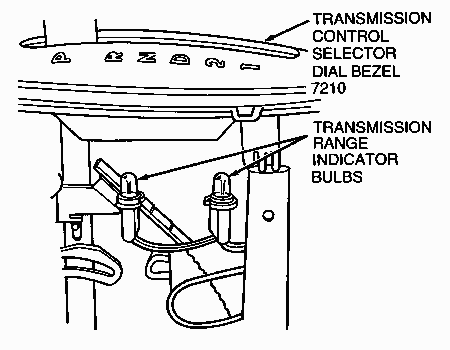
Transmission Range Indicator Lamp Bulb, Floor Shift
On vehicles equipped with floor-mounted transaxle range selector levers, a redundant transmission control selector indicator illuminates and displays the selector lever position on the instrument cluster. The procedure below is intended for the removal and installation of the transaxle range indicator bulbs in the transaxle range selector lever and housing.
Removal and Installation
1. Disconnect battery ground cable.
2. Unsnap and remove upper console bezels.
3. Unsnap and lift transmission control selector dial bezel from transaxle range selector lever housing.
4. Remove two bulbs from transmission control selector dial bezel.
5. To install, reverse Removal procedure.