
Home | Mailing List | Specifications | Care and
Feeding | Modifications | Vendors | Literature
The removal of the upper intake manifold is the start of many service procedures like checking valve clearance and changing the spark plugs. I expect this page to be visited, or at least printed often. Comments, suggestions, and other helpful hints are always welcome.
Upper Intake Manifold | Lower
Intake Manifold
Removal
1. Disconnect battery ground cable.
2. Remove engine appearance cover as described.
3. Remove right half of cowl vent screen.
4. Remove throttle body as described.
5. Disconnect the main emission vacuum supply hose from the surge
tank vacuum fitting and EGR valve (EGR valve). Position vacuum
supply hose out of the way.
6. Disconnect vacuum tube from intake manifold vacuum union.
7. Remove the two retaining bolts for the transducer mounting
bracket from the surge tank. Position the transducer mounting
bracket out of the way.
8. Remove the two intake manifold supports from the surge tank
and cylinder head.
Transducer Mounting Bracket and Intake Manifold Support
Installation
| Item | Part Number | Description |
| 1 | 95027-08016 | Bolt (2 Req'd) |
| 2 | 9J432 | Transducer Mounting Bracket |
| 3 | A9908 | Stud Bolt (2 Req'd) |
| 4 | 95824-08035 | Bolt (2 Req'd) |
| 5 | 9J444 | Intake Manifold Support (2 Req'd) |
| 6 | 9D477 | EGR Valve to Exhaust Manifold Tube |
| 7 | 9D475 | EGR Valve |
| A | -- | Tighten to 18-28 N-m (14-20 Lb-Ft) |
| B | -- | Tighten to 25-35 N-m (19-25 Lb-Ft) |
9. Remove EGR valve.
10. Remove retaining bolts and surge tank stay from front of
surge tank.
11. Remove bolt, nuts and surge tank stay from rear of surge
tank.
12. Disconnect crankcase ventilation tube from valve cover.
13. Disconnect crankcase ventilation tube from surge tank.
14. Disconnect vacuum tube to fuel pressure regulator.
15. Disconnect RH crankcase ventilation hose and position aside.
16. Loosen intake air connector hose clamps and remove surge tank
from engine.
Surge Tank Removal
| Item | Part Number | Description |
| 1 | 9424 | Intake Manifold |
| 2 | 8287 | Hose Clamp |
| 3 | 95024-08016 | Flange Bolt |
| 4 | 9J444 | Rear Surge Tank Stay |
| 5 | 95704-06500 | Nut (2 Req'd) |
| 6 | 90116-06606 | Stud Bolt (2 Req'd) |
| 7 | 9J444 | Front Surge Tank Stay |
| 8 | 95024-08016 | Bolt (2 Req'd) |
| 9 | 95024-08035 | Bolt |
| 10 | 9F722 | Air Tube to Throttle Body Hose |
| A | Tighten to 18-28 N-m (14-20 Lb-Ft) | |
| B | Tighten to 5-7 N-m (45-61 Lb-In) |
17. Remove radio ignition interference capacitor bracket
retaining bolt and position radio ignition interference capacitor
aside.
18. CAUTION: When removing engine components, always remove
retaining bolts in reverse of tightening sequence (as shown) or
damage to engine components may occur. Remove intake manifold
retaining bolts in standard loosening sequence.
19. Remove upper intake manifold and intake manifold upper
gaskets from lower intake manifold and discard intake manifold
upper gaskets.
Installation
1. CAUTION: New upper intake manifold gaskets must be used or
damage to the engine may occur.
Position new upper intake manifold gaskets on lower intake
manifold.
2. CAUTION: Upper intake manifold bolts must be tightened in
sequence shown or damage to the engine may occur.
Position upper intake manifold on lower intake manifold and
install retaining bolts. Tighten bolts in standard tightening
sequence to 18-28 N-m (14-20 lb-ft).
3. Install radio ignition interference capacitor bracket and
retaining bolt. Tighten retaining bolt to 8-12 N-m (71-106
lb-in).
4. Position surge tank on engine and align intake air connector
clamps as shown. Tighten clamps securely.
Intake Air Connector Hose Clamp Orientation
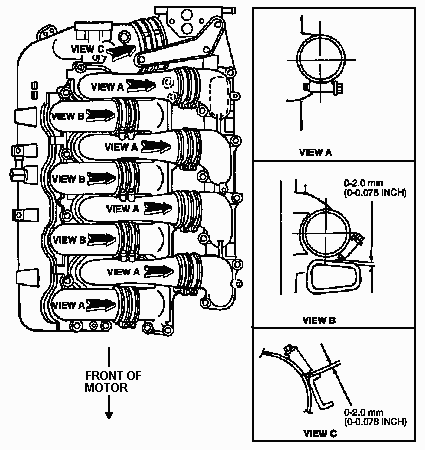
Surge Tank Installation
5. Connect RH crankcase ventilation hose.
6. Connect vacuum tube from fuel pressure regulator to surge tank
fitting.
7. Connect crankcase ventilation tube to surge tank fitting.
8. Connect crankcase ventilation tube to valve cover.
9. Install rear surge tank stay and retaining bolts and two nuts.
Tighten bolt and nuts to 18-28 N-m (14-20 lb-ft).
10. Install front surge tank stay and retaining bolts. Tighten
retaining bolts to 18-28 N-m (14-20 lb-ft).
11. Install EGR valve.
12. Install two intake manifold supports from surge tank to
cylinder head. Tighten retaining bolts to 18-28 N-m (14-20
lb-ft).
13. Position transducer mounting bracket on surge tank and
install retaining bolts. Tighten bolts to 18-28 N-m (14-20
lb-ft).
Transducer Mounting Bracket and Intake Manifold Support Installation
14. Connect vacuum tube to intake manifold vacuum union.
15. Connect main emission vacuum supply hose to the surge tank
fitting and EGR valve.
16. Install throttle body as described.
17. Install right half of cowl vent screen.
18. Install engine appearance cover as described.
19. Connect battery ground cable.
Removal
1. Relieve fuel system pressure.
2. Disconnect battery ground cable.
3. Remove upper intake manifold as described above.
4. Disconnect fuel supply and return lines from fuel injection
supply manifold.
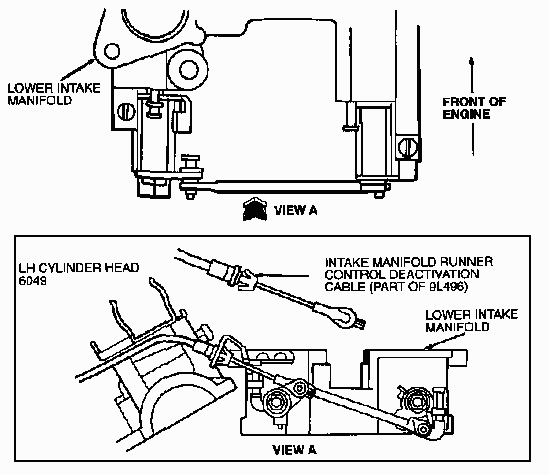
5. Disconnect intake manifold runner control deactivation cable
from lower intake manifold (IMRC). Remove cable from bracket and
position aside.
6. Disconnect engine control sensor wiring from fuel injectors
and wiring retainers. Position engine control sensor wiring out
of the way.
7. If required, remove fuel injection supply manifold and fuel
injectors from lower intake manifold (IMRC).
8. Remove lower intake manifold to cylinder head retaining bolts.
9. Remove lower intake manifold (IMRC) from cylinder heads.
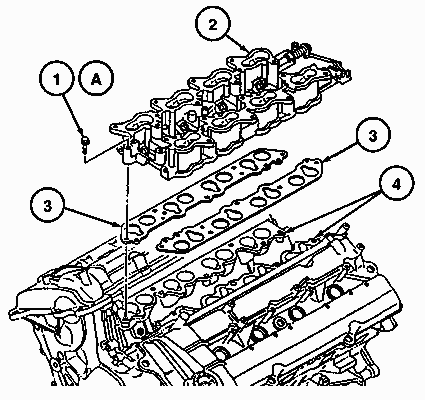
| Item | Part Number | Description |
| 1 | 95027-08055 | Bolt |
| 2 | 9L490 | Lower Intake Manifold (IMRC) |
| 3 | 9439 | Intake Manifold Gasket |
| 4 | 6049 | Cylinder Head |
| A | -- | Tighten 18-28 N-m (14-20 Lb-Ft) |
10. Remove intake manifold gaskets from cylinder heads and
discard intake manifold gaskets.
Installation
1. Note: Verify operation of intake manifold runner control
plate operation.
Follow removal procedure in reverse order using new intake
manifold gaskets.
2. Tighten lower intake manifold retaining bolts to 18-28 N-m
(14-20 lb-ft).
3. Connect fuel supply and return lines.