
new 8/27/02, updated 4/26/2004
I changed my tranny fluid today. After the convention it was pretty dark. Well it was very dark, looked like used motor oil and only 10k on it. Although there was two days at Summit Point in those 10k miles. Last time Redline D4 will ever be in one of my transmissions. Back to the Amsoil. There was also a lot of black slime all over everything. This was also on the magnet so I assume it is a ferrous metal compound. The good news is no brass bits anywhere which wasn't the case with my old tranny every time I changed the fluid. I assume the clutches are brass?
One thing I noticed is that FPS didn't put the bolt back in (or it fell out) that connects the tranny and exhaust just before the front cat. This is a very good path for some major exhaust heat into the tranny. A sawzall did the amputation in a minute. And the Y-pipe is still very rigid without it.
The other thing is coolers were plastered with grasshopper and butterfly parts. It was unbelievable.
I also measured the tranny pan capacity, depth and dipstick insertion length. The pan holds 3 quarts and is 43mm deep +3 mm more for the gasket, say 45mm total depth installed. The dipstick sticks down from the edge where the pan gasket sits by 17mm. The stick from the tip to the full mark is 19mm but is at an angle so 17mm is the actual depth the stick is vertically in the fluid.. Each quart takes up 15mm of the pan. So I would say that when the stick is on the full mark the pan is completely full plus a bit. And I still don't see any parts that are rotating in there like a crankshaft would be.
Paul Nimz
'97 TR
'93 EG mtx
__________________________________________________________________
4/26/2004
Here's the easiest and cleanest way to change the fluid and filter.
1. You will still spill some fluid when dropping the pan. Best just spread out
the oil dry before starting.
2. Jack up the car and place on jack stands.
3. Next disconnect the line on the drivers side of the aux ATX cooler. Put the
tranny side line in a five gallon bucket. Attach a piece of 3/8" hose to the
cooler where you just disconnected the line and place it in the bucket.
4. Start the engine and wait until the fluid almost stops. There will be a
definite difference in the amount flowing out.
5. Stop the engine.
6. Start loosening the bolts on the pan. There is still 3-4 quarts in the pan.
Position a drain pan under the tranny pan and on the drivers side. Loosen and
remove all the bolts but two on the passenger side. This will let drivers side
will tip down as you then slowly loosen the remaining two. After the pan is
mostly down and the fluid is in the drain pan remove the pan completely and
replace the filter. Be sure to remove the rubber ring that will stick up in the
tranny filter mount. Just bend it in with a screwdriver and pull it out with a
needle nose. Do not scratch the aluminum tranny filter holding housing.
7. Reusing the OEM gasket and in a three pass sequence progressively tighten
every other bolt until all are tightened. Do not over tighten as they really
just need to be snug. Use a 1/4" ratchet drive socket.
8. Then add 10 quarts. Start the motor and wait until it almost stops pumping
fluid out or until you see new fluid coming out. Better to waste a quart or two
of new fluid to insure all the old stuff is out.
9. When the flow has almost stopped, shut off the engine and reconnect the
hoses.
10. Add 5 quarts, idle motor and check level keeping it on the low side on the
dipstick.
11. Then drive the car for a while to heat up the tranny fluid and recheck and
top off the fluid.
Paul Nimz
'97 TR
___________________________________________________________________
Also, you will want to have more than 10 plus 5 quarts of fluid for the topping
off part of the fluid change. 17 qts is what it takes me, I believe. I buy 20
qts, just in case I spill some, and so letting some clean fluid through will be
OK.
(just reading between the lines in your other post and the instructions)
I like to put a really large piece of cardboard under the car. It is more
comfortable to work on than concrete, and will keep the concrete clean.
Also, (and this is where I get rather anal compared to 99.99% of the population)
if you are going to save a funnel, etc., put it where it will not get dust or
dirt on it before the next fluid change (sealed bag or container?). I don't like
putting dirt into my car along with fresh fluids.
Best Regards,
Doug
____________________________________________________________________
I don't recommend any additive or flushes for the tranny. Just follow the
directions on the website and you should have any problems. And forget the
Chiltons. Get yourself a Ford service manual. I got one on e-bay for $25. I've
also got a CD-ROM with the Ford Service manual for every 1997 Ford vehicle.
Those can be found on e-bay as well. flatratetech.com also has DVDs and
CD-ROMs with the service manuals.
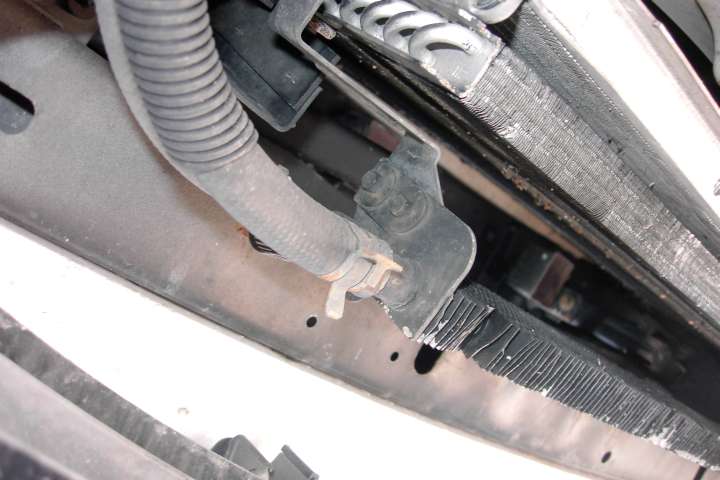
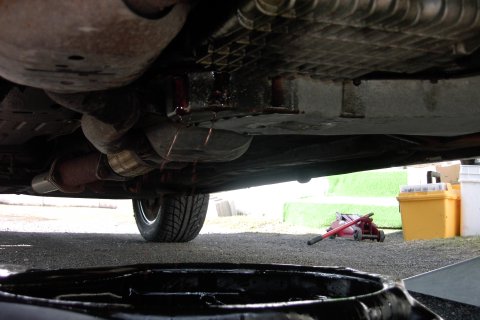
I've attached a couple of pics I took during my last tranny flush. The first two
show the tranny pan and the 19 bolts you'll have to remove. The third picture
shows the finned power steering cooler. The tranny cooler is hidden right above
that.
Ian

Trans cooler Trans Pan Trans Pan II