
| The intake on the Generation 3 SHO is very restricted.
The V8 SHO motor will flow 420 CFM at 7200 RPM's. The K&N 0940
cone filter will flow 660 CFM; more than the car will ever use.
The first step in any performance modification is to allow the car to
breathe better. This is a procedure for installing the K&N Cone
Filter onto the stock Mass Air Flow sensor for the 1996 Ford Taurus SHO.
The author makes no claims or guarantees that this modification will work
properly for any vehicle. If you choose to modify your vehicle based
on these instructions, you do so at your own risk. Installation of
oil impregnated air filters will void your warranty. Since I don't
have a warranty, I don't particularly care.
|
What you will need:
|
| Step 1: Air Box Cover Removal
Open the hood and loosen the hose clamp that holds the air tube to the MAF. Remove the air temperature sensor on the air box cover by twisting it slightly. Detach the MAF wiring harness from the MAF. Open the two quick release snaps that hold the air cover on to the air box, and remove the air box cover (with the MAF attached) from the engine bay. Remove the 4 nuts that hold the MAF to the air box cover and remove the MAF from the air box cover. There should be a thin rubber "O" ring gasket that fits between the MAF and the air box cover; you will need this "O" ring later in the installation. |
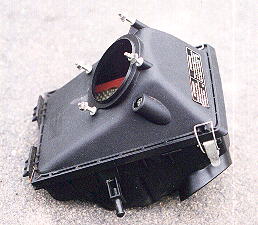 Step 1
|
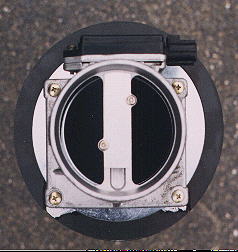
| Step 2: Lower Air Box Removal
Remove the panel air filter and remove the two bolts that hold the lower air box to the vehicle. One bolt is on the fender side, the other is on the strut tower side. Inside the air box, you'll see the air inlet tube that feeds air to the motor from inside the fender. There are three tabs that secure the tube to the air box. Using a utility knife, make a cut along each side of each tab. This will allow you to bend the tabs in and slip the air box off of the inlet tube. Remove the air box from the vehicle. |
 Step 2
|
| Step 3: Mounting the Cone to the MAF
Place the MAF on the cone filter to locate the position of the mounting screws. Notice from the picture to the right, that the foam gasket on the cone filter base must be removed in two areas to allow the MAF to sit flush on the cone filter base. This can be done with a razor blade. With the MAF lined up with the cone filter base, mark the location of the 4 mounting holes. Drill 4 small and shallow pilot holes on the marks you made on the base of the cone filter. Don't drill too deep, the base of the cone filter is 1/4 of an inch thick at most and you do not want to damage the gauze filter and the metal mesh. After drilling, turn the cone filter upside-down and shake out any metal shavings that may have fallen into the filter. Install the rubber "O" ring onto the MAF and relocate the MAF onto the cone filter base. The "O" ring will serve as a gasket between the MAF and the cone filter base. Using 4 screws no longer than 3/4 of an inch, attach the MAF to the cone filter base. |
 Step 3
 |
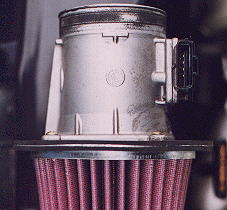
This image shows the thickness of the cone filter and MAF bases. |
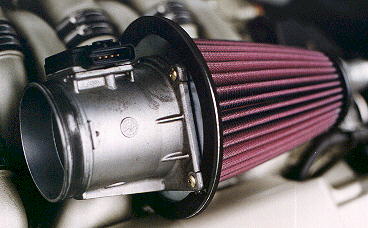
This image shows the completed installation of the cone filter onto the MAF. |
| Step 4: Re-mounting the MAF & AT Sensor
Slide the MAF/cone filter assembly back into the air tube that leads to the throttle body, and tighten the hose clamp. The wiring harness on the stock assembly was located on the side of the MAF and was difficult to release. Make sure that you rotate the MAF and cone filter so the wiring harness is on top and easier to access. Now rest the tip of the cone filter on the air inlet tube that protrudes from the fender. This will hold the filter in place, securely. With the MAF installed, locate the air temperature sensor and fasten it to the negative battery ground cable with a zip-tie. |
 Step 4
|
| Step 5: Test Drive!
What you will notice: 1st; how much you love this car!!! 2nd; the car has secondaries! When you're tach reaches 3400 rpm's you'll see what I mean. With this modification, I can finally hear the sound of the motor over the sound of my exhaust, it is truly unreal; what a great sound. 3rd; the car shifts differently. From a 20 mph rolling start to wide open throttle delivers a kick in the pants!!! That wasn't there before. Shift points are much more noticeable; although I'm not sure if they come in any sooner, I never paid attention before. 4th; power and torque? I'm still waiting for the dyno results, but the Corral Web site says that my 15.4 second run at 90 mph with vehicle weight at 3800 lbs. (for the car, driver and 3/4 tank of gas) is worth 205 HP to the wheels. May seem a little high for a car with a cone filter and an aftermarket exhaust, but we'll see!!! |
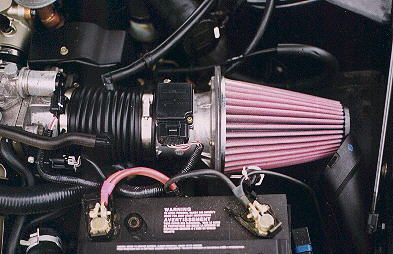
Image of finished installation. |