
John likes to see at night while driving. Here is his headlight solution:
In case anyone is interested (and I'll bet they are), I just found some new headlight bulbs in the J.C. Whitney catalog. They replace the stock 9007's. The stock bulbs are 55/60 watts. The new bulbs are 80/100 watts. Much brighter than stock. They are "FOR OFF-ROAD USE ONLY" yeah, right. (D.O.T. limits bulb wattage to the stock values) They will certainly give the car the lighting it needs to match it's speed. I often found myself out driving the stock lights. Whitney also caries 9004, 9005, and 9006 bulbs for other auto's as well. This is the only place I've been able to find better bulbs. The cost of the bulbs is $14.95 each. I believe it may be necessary to up the fuse a few amps.....not sure yet.
I have recently installed the high powered (80/100) watt bulbs in my car and
can report the following. When testing the original amp draw for the
standard bulbs versus the new bulbs, amp draw would indicate the new high
wattage bulbs actually put out 68/80 watts
based on the current draw. They could however be 80/100 based on
efficiency. They do however seem to be much better than stock. From
what I can tell, changing the fuse should not be necessary. (However if it is,
there are 2-20 amp spares under the fuse
cover). The current draw I saw hopefully will not cause any undue
stress on the circuitry or DRL module. Personally, I'm willing to take the
chance since the stock lights suck so bad. However, if you are going to
install these bulbs, don't blame me if you have
any problems. So far these bulbs seem to work MUCH better than the
factory birthday candles.
Thanks to Tim Wright for this Headlight Adjustment Tip:
 For
some reason all the 96+ SHOs come from the factory with the headlights aimed at
ground directly before the car. This erroneously gives the impression that the
headlights are the pits which is not true, they are just poorly aimed. The
simple solution if your car is still under warranty tell the dealership to
"fix it."
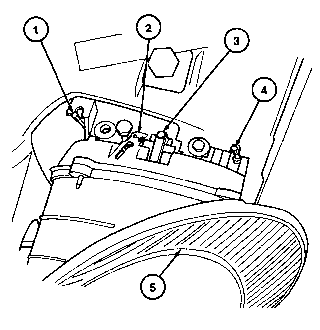
Otherwise, for "do it yourself" types Ford has made it an easy task - if you have the correct tools. Otherwise the tools are inexpensive. Each headlamp unit has a bubble level (3) built in to assist in adjustment. The only tool needed is an inexpensive Torx #15 which is like a Allen wrench of sorts. In a pinch a 7 mm socket or wrench will work..
First you need to park your car on a dead level surface, then open the hood. Each headlamp unit has two adjustment screws behind the unit. The inboard screw (1) on each unit controls "toe in" - left and right adjustment and typically need not be touched.
What you need probably need is the vertical adjustment screw (4) to pull the beam up, they have all been set too low at the factory so far. Using either a Torx # 15 or a 7 mm wrench adjust the screw until the bubble is centered. Use a delicate touch, the bubble is lively and it will over shoot the mark if you use a heavy touch. If the bubble is not visible either the parking spot is not level or the headlamps are way too high or low. If you are certain the parking spot is level you can use the adjustment screw to chase the bubble to center.
For a simple adjustment you will be rewarded with much better night visibility.