
Al Primm offers a "Mousetrap" removal procedure that even the mechanically challenged can follow.....
I offer these insights into the removal of the "mousetrap" as detailed in the 96+ FAQ's.. I read what was on the FAQ,, printed it out, and proceeded with the operation....
When preparing to perform this mod, you will need:
1 small box or can to hold parts.
1 Phiilips #2 screw driver
1 small prying device... a 4" standard screwdriver
works wonderfully 1/4" ratchet drive , and a couple of 6" extensions.
8 mm open/box wrench
10 mm open/box wrench
7/32 or 5.5 mm socket (I used the 7/32)
1/2 " or 13/14 mm socket ( I used the 1/2")
1 pair channel lock pliers, or vise grips...
( I used the Channel locks)
1 Jack stand or floor jack.
First thing to do is start the car up, turn the wheels completely to the left...(Drivers side), turn off the engine and open the hood. My first impression was "How the **** did they ever get this much **** in here?" All awe aside, place a blanket over the right side of the engine (passenger side).. This was, when you put your tools down, they will not roll places that you cannot reach them... Murphy is alive and well.
 OK,
Open the air cleaner, remove filter. Disconnect the electrical connector
from the top FRONT half of the lid. Using the 10mm box
wrench, remove the four nuts attaching the MAF to the lid....Its tricky,
gotta reach around underneath, DONT DROP THE NUT's!
Place the four nuts in a safe place, like in a small box, on top of the
blanket. Remove lid to safe place, next to parts box.
OK,
Open the air cleaner, remove filter. Disconnect the electrical connector
from the top FRONT half of the lid. Using the 10mm box
wrench, remove the four nuts attaching the MAF to the lid....Its tricky,
gotta reach around underneath, DONT DROP THE NUT's!
Place the four nuts in a safe place, like in a small box, on top of the
blanket. Remove lid to safe place, next to parts box.
OK, You now have an open hole, the air cleaner
box, and you can see a large hole from the front ..This is the air inlet.
Above and behind the box, on the outside,
are two bolt heads... Use the 8MM socket to remove them. There is
a plastic pin on the front of the
airbox, it locates in the side of the battery
holder box. Be careful not to break this off during removal of the
box.
OPTIONAL : Now you have to disconnect
the airbox from the air inlet. Using the pliers and prying device,
pop the three little locks holding the tube
in the box. Takes some time, but it gives more room to work later.
Remove lower air box. put it next to the top
piece.
At this stage you have done about as much damage
from the top as you can, so jack up the front of the car, and start below.
A Jackstand placed on the frame inboard of the front tire will work fine,
you will need about 12-18 inches of room below the bottom of
the fascia. More is better if you can get it.
 The
first thing I did was remove the inner wheel well. There are three
screws, 2 bolts, and a plug retainer holding it in place. Two screws at the front, and upper front of the wheel
arch. The third screw is center of the wheel well, and attaches the
front shroud to
The
first thing I did was remove the inner wheel well. There are three
screws, 2 bolts, and a plug retainer holding it in place. Two screws at the front, and upper front of the wheel
arch. The third screw is center of the wheel well, and attaches the
front shroud to
the back..Its above the middle of the tire.
Behind the wheel, on the inner side behind a cable bracket is the little
flush retainer..Looks just like what they
use to hold the fascia in place in the trunk, and interior. To pry
this out, use the screwdriver to start it,
the channel locks to finish it. At the front, underneath there are two
5.5 mm bolts remaining, attaching the plastic. Remove them,
and carefully work the plastic out. Put this aside, out of the way.
Next using the phillips screw driver, remove three or four of the phillips screw running along the outside (body color) of the lower fascia or spoiler... Expect sand and dirt to fall out, it will. At this point crawl or slide under the front enough to see the bolts attaching the inner panels. Remove 4 or five of these, as many as you need to get access to the inner spaces. I have large hands, and arms, so for me more is better.
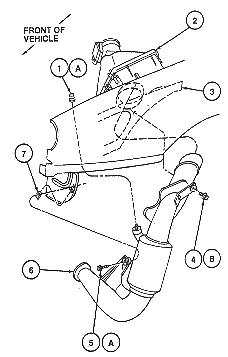
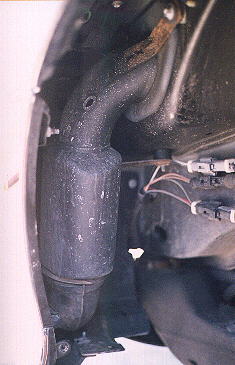
Looking into the space you will see the large tube coming from inside the engine compartment, going down and curving back up..(Yes, it looks just like a saxophone.) At the bottom, before the tube turns, there is a seam, with a gasket. From here you can do two things: remove the top half, or try to remove the bottom half, but half of it has to move! I chose to move the top. Looking at the tube you will find two brackets holding it in place, one has a 8mm bolt like the ones holding in the airbox. The other has what looks like a vibration mount. First remove the bolt. And now back to the engine compartment.
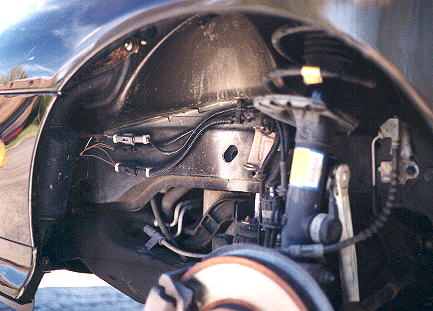
 As
you look at the battery, you will see between the battery and the fender
lives a small black box, and a clip like the one on the air box.
Unlock the clip, move the black box thingy forward, and at the bottom underneath
all that stuff, is a funny looking gold protrusion.
This is the nut to the bracket underneath. Using the 13 or 14 mm
socket, or 1/2" like I did, remove this nut. You will want
to use both 6" 1/4" drive extensions for this.
As
you look at the battery, you will see between the battery and the fender
lives a small black box, and a clip like the one on the air box.
Unlock the clip, move the black box thingy forward, and at the bottom underneath
all that stuff, is a funny looking gold protrusion.
This is the nut to the bracket underneath. Using the 13 or 14 mm
socket, or 1/2" like I did, remove this nut. You will want
to use both 6" 1/4" drive extensions for this.
Back underneath now. The entire assembly
is loose and sloppy now and there is room to move things around.
Using the prying tool (standard screwdriver)
insert it into the seam of the saxocone. Pry it around a bit and
it should separate. Mine was stuck real
good. You will find a thin foam gasket in the
joint, try not to break this.
Now that you have split the seam you can look up into the upper housing. You will see ...nothing! That is because the inner tube is flush with the bottom of the outer housing. Again, insert the prying tool between the two pieces and work the inner one out. The inner housing is held in place by three little locks, just like the ones holding the airbox and air inlet together.... You can try to unlock them with the screwdriver, or just muscle it out with brute force... Whatever works for you. What came out, in my case was a 7.5 inch long, 2.75 inch diameter black plastic tube... like the others in the group have mentioned... Now that it is out, throw it away, save it, bronze it...whatever.
All you have to do is put it all back together, in the order that you took it apart. Be careful when reattaching the nuts on the MAF, DONT DROP THEM! They are hard to find. And don't forget to reattach the little electrical connector on the top front of the upper airbox lid... You will get a CE light if you don't.
I completed this job in 45 minutes from scratch, in an unheated garage, outside air temp was 26F. A good winter job, I don't recommend doing it without heat.
I rate this modification 2 Wrenches and a band aid.... Suitable for the marginally mechanically challenged.