

(Photos courtesy of Helm Publications.)
The SHO Shop makes a 20% Under Drive Pulley for the 96+ SHO. Only one pulley is needed; a large belt pulley which drives the 130 amp alternator, the Variable Assist Power Steering, and the scroll type AC compressor. Since the water pump is driven by a drive chain from the cam shaft, engine cooling is unaffected.
The theory is that a smaller pulley will drive the accessories slower thus reducing their parasitic horsepower loss. The factory pulley is 6.25" at the belt surface and the replacement is 5" measured the same way. A side benefit is the reduction in wear on the accessories, they should last 20% longer.
The pulley is located on the passenger side which is the "front" of the engine. To install a UDP you need a lift, air tools and something else like a tall stand to support the weight of the sub-frame.
Both the factory pulley and the replacement weigh 8 lbs. They have to, since they are required to balance the engine. The factory pulley is steel and the replacement is aluminum, smaller diameter, and weighs the same. So it has to be thicker or wider thus the nature of the install problem. You can remove the factory pulley with clearance to spare but the hitch is getting the fatter UDP on.
The SHO Shop charges $249 for the UDP and belt. I was skeptical about the cost before I saw one. It is a jewel of machine work; two piece, 4 roller pins to keep it from slipping, with a huge HD cir-clip holding the rim to the center. I can see the value in the machine hours required to make the thing. I was thinking of some clunky casting but this is top shelf. I can see why they aren't "free". Nice fit and finish, top shelf design.
Procedure
First you need to put the car on the lift.
Then remove the passenger front tire.
Use a screw driver to remove the black splash shield (inner fender)
to gain access to the side of the engine.
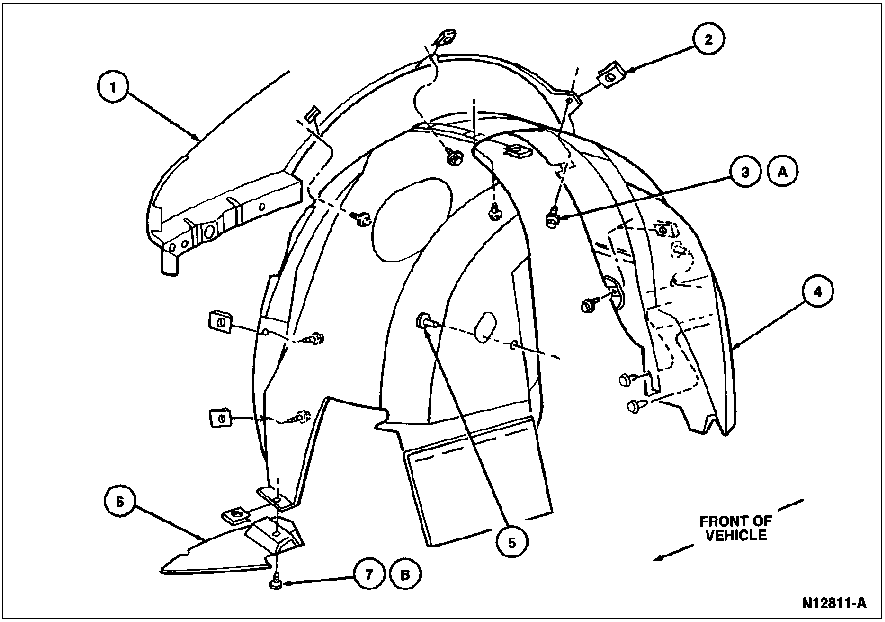
Support the sub-frame on the passenger side and back off the two bolts
attaching the sub-frame on the passenger side. It is neither wise nor helpful
to completely remove the sub-frame bolts, all you need is to back them
off an inch or so to achieve the necessary clearance.
Raise the whole car using the lift about an inch; remember the above step: SUPPORT the sub-frame. Do not depend on the two backed off bolts to hold the weight of the sub frame and keep the mess from crushing you like bug.
Using a 3/8 inch ratchet on the lifting lug, rotate the drive belt tensioner
counterclockwise (upward) and engage spring keeper. Remove the drive belt
from the drive belt tensioner.
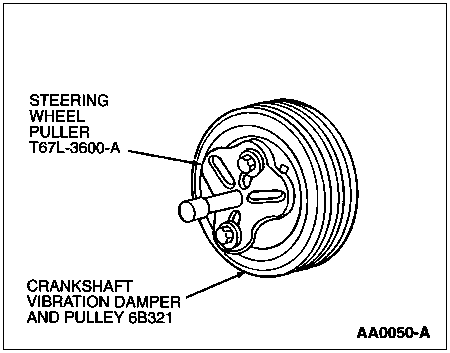
Remove the center bolt holding on the factory pulley (air tool).
Use a steering wheel puller to pull the OE pulley from the crank snout.
Installation
Note: Prior to applying sealer, clean sealing surfaces with Metal Surface Cleaner F4AZ-19A536-RA or equivalent meeting Ford specification WSE-M5B392-A, to remove all residues that may interfere with the sealer's ability to adhere.
Apply Black Silicone Rubber F4AZ-19562-B or equivalent meeting Ford specification WSE-M4G323-A1 to the front of the crankshaft on the inside diameter surface of the crankshaft pulley at the keyway.
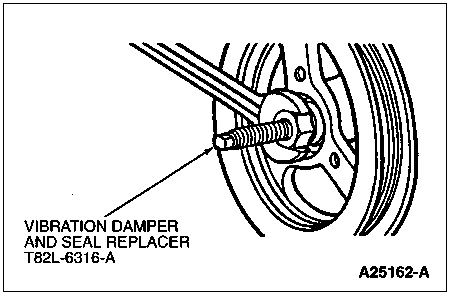
Install crankshaft pulley using Vibration Damper and Seal Replacer T82L-6316-A and washer from crankshaft pulley bolt. Put anti-seize compound to prevent the new UDP from gaulding onto crank snout, line up the key and the key way. Use a bolt to pull on the UDP or start it by gently taping it on using a soft drift or piece of wood. Ford makes a special tool to do this, because the bolt you have is too short to pull the new one on. So either use your parts chaser car to obtain the metric bolt you need, buy the Ford tool, or just get it started by taping it on then use the bolt to tighten it down.
Install crankshaft pulley bolt and washer. Tighten retaining bolt as follows:
Replace the OE belt with the supplied Gates Micro V K060882 (21 mm x
2255 mm). Rotate drive belt tensioner, as described under Removal procedure
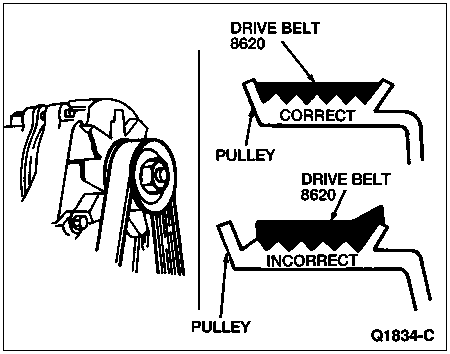
and install drive belt over drive belt tensioner pulley. Make sure all
V-grooves make proper contact with pulleys. Make sure the spring keeper
is released or improper belt tension will occur.
| 1 | Power Steering Pump Pulley |
| 2 | Idler Pulley |
| 3 | A/C Compressor |
| 4 | Drive Belt |
| 5 | Crankshaft Pulley |
| 6 | Drive Belt Tensioner |
| 7 | Generator |
| 8 | Idler Pulley |
| 9 | Idler Pulley |
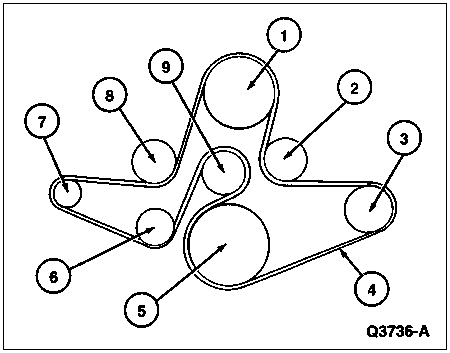
Use your power tool to retighten sub-frame bolts
Front Insulator-to-Frame Nuts torque spec 77-103 N-m or 57-75 Lb-Ft
Tighten the retaining screws for splash shield.
Replace passenger side wheel.
The whole job can be done in a hour, hour and a half max.
Get a test drive in.
|
|
|
| Description | Tool Number |
| Steering Wheel Puller | T67L-3600-A |
| Vibration Damper and seal Replacer | T82L-6316-A |
The nice thing about UDP is not that they make a huge amount of peak HP, but that they make a 3-5 HP improvement from off idle, all the way to redline. In a SHO, off idle torque is always welcome. Some 89-95 SHO owners have raised the idle to compensate for the lower charging amps at idle but the Gen 3 has a 130 amp alternator and it is not required. The A/C used to be able to form ice crystals in mid air. At idle, it is still more than adequate on 90 degree days. I have noticed improved feel in the steering; not so much to be called increased effort. I always thought the power steering to eager to help, now it is perfect.
The UDP, for $250 and a 5 HP gain, doesn't give a great bang for the buck. Intake and exhaust modifications will yield more HP per dollar spent and should be done first. Once you change the mufflers and add a SHO Shop intake and by-pass pipe, you may as well go the last HP step short of NOS or a supercharger.
A bone stock 3 gen SHO will dyno 185 hp. A SHO with UDP, by-pass pipe, Hi-flow intake, and cat back system will make 27 HP more than stock (measured at the wheel or 212 HP.) The UDP makes a big help, vitally useful in the 0-60 performance range and at the same time adds to the peak HP numbers.
Now you don't have turn off the AC on 90 degree days to put pretenders in their place. ;-)
Important Update, the outside of the SHO shop UDP rides on an oil seal. My UDP came with a very fine machine finish, like a very fine thread that is too small to see. Once installed it leaked oil. I had the UDP removed, and used fine emery cloth to remove the finish and make it smooth and oil leakage stopped all together. B.T.J.
Price and Part Numbers:
ASP Racing in Texas at 281-261-5811 and ask for Candice. Tell her you need part # 928300 for the 3.4L V8. This is for the actual pulley. Cost is $179.
The belt is $15 at any Autozone. This part number is theirs. Gates Micro - VK060882, Cost - $14.95. If they cross reference it on their computers tell them to leave out the "V" and it will pop right up.
Install of the UDP should be about $50.
NOTE: First SHO Shop quit selling the one piece UDP, then ASP started selling them, but some ASP UDP failed. Now SHO Shop is selling a 3 piece set of UDP that does not include a pulley for the crank snout. See www.shoshop.com for latest info.
Tim Wright 3/19/02
Now posted are the details of the V8 Underdrive
Pulley Group But on www.shoshop.com.
The SHO Shop Underdrive Pulleys retail for $199 but we are offering a $30
discount for the first 10 people to sign up on the list. See the website for
more details. Expect a 6hp gain with the pulleys installed.
As for running the SHO Shop pulleys with the ASP Pulley, I don't see how it
would do any damage besides extra effort in steering, but I wouldn't recommend
it. The reason we manufactured our own pulleys in the first place was due to the
failure of the ASP Pulleys.
Any questions you may have or signups can be directed to 714-894-8415.
Tom Guagliardo
Manager/Tech - SHO Shop
I've been following this on and off since it started.
How are they trying to remove it. When I did mine I tried 2 different 1/2"
impacts. One wouldn't budge it and the other would loosen it about 1/16 of a
turn and stop. It would also tighten it back up. I ended up using a cloth strap
wrench on the pulley, wedging it against something (the A/C compressor pulley?)
and using a breaker bar and my foot to break it loose. It was tough, but I got
it. Putting it back on to factory specs was also difficult. Basically the
reverse procedure, but using a torque wrench.
Glen Murdock
Ford said they tried a 1/2" impact, a 3/4"
impact and heat. I cannot confirm any of this. I watched a big guy
with a breaker bar and a 3' cheater try to no avail. He is going to try
heat and muscle on the 1st. I suggested a breaker bar wedged against the
frame and then bumping the starter as they do on the V6's. He was wary but
I think I can talk him into it as a last resort. I sure don't want to
break the bolt. Why did Ford use such a small bolt head anyway?
Maybe weight savings strategies.
Paul Nimz
'97 TR
tightest nuts (and bolts) in town
The bolt head is small, but I seem to remember the bolt
itself is 14mm. I'd be extremely leery of using any heat on it. There's
expensive stuff in there. I don't know if the V6 trick would work or not. I
think the impacts have trouble because they hammer at it and can't apply smooth
power which you can if you can block the engine from turning and use a breaker
bar. I don't remember seeing any Loctite on the threads. It's a turn to torque
tightening procedure - Tighten crankshaft pulley bolt to 105-135 N-m (78-99
lb-ft). - Loosen crankshaft pulley bolt a minimum of one full turn. - Tighten
crankshaft pulley bolt to 47-53 N-m (35-39 lb-ft). - Rotate crankshaft pulley
bolt an additional 85-95 degrees. - which for whatever reason makes it hard to
remove.
Glen Murdock
I finally got the UDP put on. The mechanic used
the socket against the frame and bump the starter trick as they do with the V6
SHO. He had never heard of it before but as a last resort agreed to try
it. Two little bumps and it pop loose. Looked too easy.
Hardest part was the removal of the pulley. It was just a slow hand
cranking process.
Then dropped the subframe and tap on the new UDP and pull it on with the air
gun. Torqued it down and them he struggled with the belt. It didn't
take to long to get it threaded right though. Charged me $75.00 for about
2 hours work. Much better than the $124.00 the Ford dealer charged for not
doing it with a free .7 hr labor for putting the fender liner back on I guess.
While it was on the hoist we looked around for the weird noise problem from the
front end and found the cause..............
to be continued.
Paul Nimz
'97 TR
ASP recommended belt is the Gates Micro K060882. I've
had good luck with my Goodyear Gatorback 882 belt which Autozone pulled up as a
cross-reference for me.
Ryan Dudek
98 Black
Clarkston, MI
----- Original Message -----
> what is the UDP belt size? mine is squeaking
again. i
> need to change it.